Pages

Friday, 2 May 2014

Week 9 - Software Installation Part 3

Week 9 :  7th - 13th Apr


Objective:
  • Focusing on coding of the project

Content: 


Week 8 - Software Installation Part 2

Week 8 :  1st - 6th Apr


Objective:
  • Focusing on coding of the project

Content:


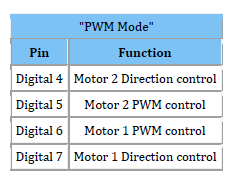
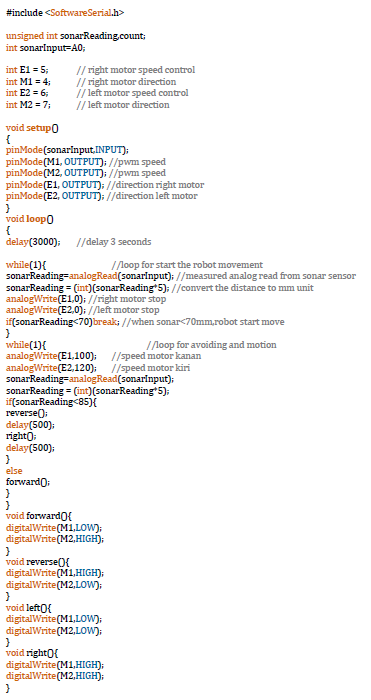
Table above show the PWM Mode for the motor and the sample coding. 

Week 7 - Software Installation Part 1

Week 7 :  17th - 23th Mar


Objective:
  • Focusing on coding of the project

Contents:


Picture above show the architecture of the Arduino Uno. With that, the input and output of the project should be in the right port.The PWM port is for the motor of the robot, Analog port is for the sensor. 

Tuesday, 22 April 2014

Week 6 - Hardware Installation Part 3

Week 6 :  10th - 16th Mar


Objective:
  • Installation the hardware of the project
Contents:

In this week, i am focusing installation on input and output of Arduino, the voltage supply fed to Arduino, which is from Lipo Battery.


Tuesday, 15 April 2014

Week 5 - Hardware Installation Part 2

Week 5 :  3th - 9th Mar


Objective:
  • Installation the hardware of the project
Contents:

In this week, I am focussing install of the Arduino Controller, the IC Regulator and battery.


The output of the LiPO battery is around 11V. Because of that, IC regulator used to reduce the 11V to 5V. The voltage for the input Arduino is directy from Lipo battery which is 11V. 
Week 4 - Hardware Installation Part 1

Week 4 :  24th - 2nd Mar


Objective:
  • Installation the hardware of the project
Contents:

In this week, I am focussing on the installation of the base of the robot. All of the 4 motor DC were install as pictures below:


Week 3 - The Main Components

Week 3 :  17th - 23rd Feb


Objective:
  • Preparation on main components
Contents:

The picture above show the list of the main components that have brought for preparation of the project.