Pages

Sunday 18 May 2014

Week 14 - Preparing on Poster & Presentation

Week 13 :  12 - 18th May


Objective:

  • Preparing the poster of the project
  • Preparing on presentation of FYP 2
Content:

After around 4 days in preparing the poster of my project, here is the final result of the poster that have been approve from my supervisor. 


In preparing the presentation, I have to write and remember the key point of my project. Based of the software or coding or component, all the datasheet have been studied and remembered. 


Week 13 - Completing the Project Part 2

Week 13 :  5tht - 11th May


Objective:

  • Completing the project.
Content:

In this week, I am focusing in final touch up on my project. After been advised from my supervisor, I finally done in doing the casing of my project. 


Here is the result of final touch up of my project. 


Wednesday 7 May 2014

Week 12 - Completing the Project Part 1

Week 12 :  28st - 4th May


Objective:

  • Completing the project.
Content:

In this week, I focusing on the overall of the project. After done with the wireless camera, the wireless camera were attached with the project as picture above.


Friday 2 May 2014

Week 11 - Wireless Camera Installation Part 2

Week 11 :  21st - 27th Apr


Objective:

  • Studying set-up on wireless camera
Content:

Here the continue of the previous procedure how to set-up the wireless camera

Step 5. Go to Network, go to WLAN. Click on the circle for Enable Wireless Connection. It shows all the available wireless networks near the camera. You should see the SSID of your wireless network.
You may want to pay attention about the Signal and Encryption for your wireless network. Click on the circle in front of the SSID of your wireless network to connect.
Once you click on the Connect button, its SSID, Authentication/Encryption will be copied to below table.

Delete all the * in the field of WPA Pre-Shared Key. Enter your WPA pre-shared key of your wireless network. Please note the pre-shared key is case-sensitive (‘A’ is different than ‘a’). So please enter the security key carefully. Then press “Apply”. 
There is no any message after you click on “Apply”. The screen seems intact. This is normal. If your wireless network uses WEP encryption, enter your WEP password repeatedly in WEP Key1, WEP Key2,WEP Key3, WEP Key4. Then press “Apply” button.

Step 6. Get to the command prompt. Use a command called “ping” to ping the IP address of the camera.

Please note the “-t” at the end of the command. It will do continuously ping until you press Ctrl + C. The result is like this.


Step 7. Unplug the Ethernet cable from the wireless camera. The wireless LED on the front of the camera turns on and flashes.


If you see replies from the camera, Congratulations, the camera is attached to your wireless network successfully. Press Ctrl + C to stop the PING command. Enter “exit” hit Enter to close the command prompt. Go to IE http://IP_address_of_Camera and you should be able to see the camera. Now you can move the wireless camera to a desired spot with its power adapter. Just power it on, the camera will connect to your wireless network successfully.


Week 10 - Wireless Camera Installation Part 1

Week 10 :  14th - 20th Apr


Objective:

  • Studying set-up on wireless camera
Content:

Here the procedure how to set-up the wireless camera

Step 1. We recommend you assign a static IP address to IP camera, therefore, you’d better know the IP addresses used in your network.
  1. Go to a computer which connects to your network as usual. Hardwired computer is preferred.
  2. For Windows XP, click on Start, click on Run. Enter “cmd” hit OK.For Windows 7/Windows Vista, click on Start, go to “Search programs & files”, enter “cmd”
    hit OK.
  3. In the command prompt window, enter “ipconfig” hit Enter. Locate the IP v4 address, subnet mask, and default gateway.
  4. You can minimize the command prompt. The command prompt will be used later.
In above example, the computer has IP 192.168.0.100 while the wireless router is 192.168.0.1.

Step 2. Install the IP Camera software from CD disk.

Step 3. We are going to change the IP address to Edimax camera to fit with our network. Open the IPCam Admin utility. The default IP address of camera is 192.168.2.3. We are going to change it to 192.168.0.10.


Click on “Configure camera”. Enter the password ‘1234’. Click Ok. The default IP is 192.168.2.3. We enter the a new IP 192.168.0.10, Gateway 192.168.0.1, and DNS server 192.168.0.1.


Step 4. Open Internet Explorer or other browser. Enter the IP address of Edimax Camera.

Login with username admin and password 1234.
If it prompts to install an ActiveX, click on Run Add-On.


Week 9 - Software Installation Part 3

Week 9 :  7th - 13th Apr


Objective:
  • Focusing on coding of the project

Content: 


Week 8 - Software Installation Part 2

Week 8 :  1st - 6th Apr


Objective:
  • Focusing on coding of the project

Content:


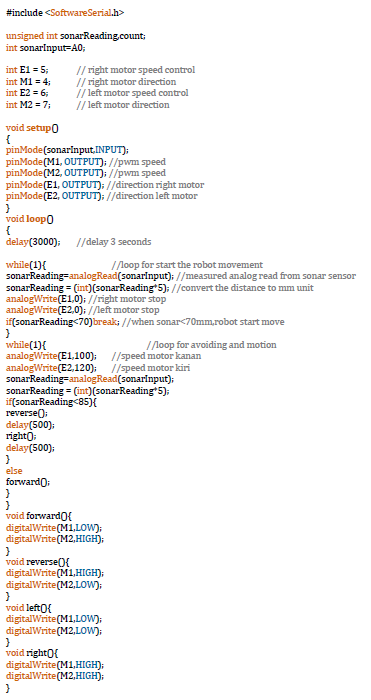
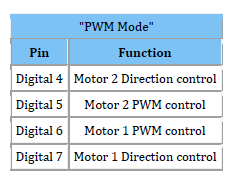
Table above show the PWM Mode for the motor and the sample coding.